Showing posts with label Activity. Show all posts

Tuesday, December 12, 2023

Plug and Play Miniseries Lesson Spotting with AI: Talking to Write

Old fashioned television with flowers.
Photo by Işıl via Pexels.

Despite widespread enthusiasm about having AI help generate content, that's not in my experience the best way to use it. One, it's doubtful it knows as much about what you want to convey on your topic as you do. Two, conversely, you're probably better at the content than you are at communicating it clearly. In this post, I'll offer a few suggestions for how to use AI to help with writing and clarity, which could be useful for both instructors trying to create educational/assignment content and students attempting to frame their ideas for coursework.

I tend to think as I talk-- the talking is the thinking, and talking through a topic helps me write it down. When I'm preparing to lead a workshop or give a presentation, I often begin by recording myself trying to give it off the cuff based on the ideas I have right now before I start outlining or writing things down. Then, I use the talk-through as the basis for the outline or script or notes. Sometimes I do this in the opposite direction; a brief and sketchy outline that I talk through and then edit based on what I said. In the past, I've always done this using Zoom and then watching back the recording.

More recently, I've started using a combination of two technologies to begin creating written work. First, I speak the ideas into text-to-speech, like dictation.io. Then, I take that text and ask ChatGPT to make it grammatically correct and separate it into sensible paragraphs. This is so much easier for me than fully typing out all the same ideas-- I can talk just about as fast as I think, while I am a decidedly slower typer despite years of practice at Typing Tutor. This strategy works best if you speak in small chunks and confirm that dictation.io is absorbing it all; I've noticed dictation.io does not capture everything I say if I speak for a long time. It's also important to communicate clearly with ChatGPT or your AI chatbot of choice-- it will attempt to smooth the language and potentially add (too many) adjectives by default, so if you want language adjustments, give clear parameters; if you just want the text to be given appropriate puncutation and capitalization, say so.

Most recently, I'm intrigued by some of the AI offerings within Zoom to transcript and summarize meetings; in theory, this could mean that a recorded first draft could have a relatively coherent text component to work from. If you have a paid Zoom account, it's worth playing with these features and seeing if they do anything for your process.

Saturday, November 25, 2023

Plug and Play Miniseries: Lesson Spotting with AI - Think Pair Share

Old fashioned television with flowers.
Photo by Işıl via Pexels.

Think-pair-share-- it's the easiest, most go-to way to get a conversation going in a room of people. It works well in rooms that don't have flexible seating for gathering into larger groups, it's a low amount of investment in setup and explanation, and it gives literally everyone in the room a chance to talk (unless one half of the pair is either real shameless or charmingly enthusiastic). And if done well, it's an "activity" that makes such intuitive sense it doesn't have to feel like an "activity."

If you haven't done think-pair-share before as a leader or participant, this description of the activity and FAQ about it is a nice introduction.

Normally, think-pair-share is conducted by humans (for NOW), but an AI chatbot can be one half of your pair or a supplement to a human pair. This was one of the first uses of ChatGPT I wondered about when it became a popular subject of conversation, and I wasn't alone! Several pieces offer ideas about incorporating AI into your Think-Pair-Share time (for example, it's one of Ditch that Textbook's 20 Ways to Use [Chatbots and Artificial Intelligence] as a Tool for Teaching and Learning). Most treatments of this idea I've seen are riffing off of this widely shared tweet by Sarah Dillard.

[An aside: one of the really funny things to me about the surge in conversations about AI in teaching is how often I now see people talking, writing about, and sharing tweets as though they're academic articles in circles where that might never have been the case before. When something is very new, many standard expectations of what kinds of things are acceptable or useful to cite shift; I imagine this is less wondrous to folks doing more present-focused work, who have frequently encountered the wonderful world of citing social media before, than to those of us who spent seven years citing while fighting microfilm-induced nausea.]

For some real zaniness, and for more insight into the tools themselves, you could have students fire up two chatbots and give them instructions, then feed their responses to one another. This can take careful prompting that will depend on the topic of discussion; it also may shed some light on the boundaries of the chatbots-- it's likely that their conversation will become a bit circular, as they tend to declare everything up front rather than have an evolving conversation (similar to some of the worst human small group activities I've been part of, really).

For more complex use of a Think-Pair-Share type framework, I love this set of options from Acadly, which suggest alternatives to insert into the process like think-write-pair-share, which encourages fuller consideration of the issue before the pair stage, and think-vote-pair-vote-share, which would work well for a question on which minds are likely to change after some collaboration or conversation on the topic. Generative AI could easily be incorporated into these steps to provide some real value; for example, comparing the written thoughts in think-write-pair-share with how ChatGPT might respond to the prompt, or asking the chatbot for reasons why someone might disagree with one's original vote in the think-vote-pair-vote-share framework.

Saturday, November 5, 2022

Enough About Me: Putting Your Source Analysis Template to Work

 So, you’ve created a source analysis activity using this template– congratulations! Now you’re ready to make it available to others so they can, you know, analyze the source. 

Regardless of which method you choose, the first step is the same: From the story view, you’ll click the title of your activity at the bottom left, then click “Publish to File” in the menu that appears. This will bring up a window where you can confirm what you’d like to name the file and where it should be saved; an HTML file will then be created.


The menu that appears when clicking the title of your Twine story. 

The nifty thing about an HTML file is that, if you open it in a browser like Google Chrome or Safari, it will open as your game, playable and looking just as you designed it to look. If you open it in Notepad or something similar, however, it will be code– code that you can use! 


This possibility gives us a lot of options for how we might wish to share our activity. I’ve talked about mechanisms for doing this a bit previously, but it’s worth revisiting here to address one of the spaces almost all teachers already have access to: an LMS space. If you don’t already have one, you can usually create one for free, and many receive these spaces from their institutions automatically.


Here is a quick walkthrough on how to incorporate a Twine activity into the Canvas LMS, with concept and code courtesy of Laura Gibbs:

  1. Create your HTML file. 

  2. Pop that file into the Files space. You could make that file visible to your class, but would probably rather hide it from students.

  3. In a new tab, open the Edit view of the Assignment or Page you’d like to add an activity to. 

  4. Click the </> button at the bottom right hand side of the Rich Content Editor in order to open the HTML view. 

  5. Copy and paste this code into the text entry field:

<iframe src="https://___/courses/___/files/___/download" width="100%" height="600"></iframe>

  1. Go back to the tab in which you have Files open. Right click on the HTML file you just uploaded and select “Copy Link Address” from the dropdown menu that appears. 

  2. Go back to the tab in which you have the Edit view of your assignment open. Select the bold text, right click, and paste the link you’ve just copied. 

  3. Save and publish. 


To see this in action, enroll in this demo Canvas space and experiment with the items available in the Source Analysis Activity module (feel free to use a pseudonym). Into this space, I’ve added some examples of what the Source Analysis Activity can look like incorporated into an LMS as a page or an assignment. In the process, I’ve taken the opportunity to update things that were or have broken (for example, the link to the Arbella Speech that I used in the first iteration of the Source Analysis Activity has since become defunct). More significantly, I edited some of the language to apply more clearly to the Canvas environment– students no longer need either so many or so vague instructions about how to turn in their answers if the activity is embedded within an assignment, for example; the activity also no longer needs to collect their name to associate with their answers, but it does still need to instruct students on how to collect and turn in their answers into a format that can be delivered to the instructor by Canvas. 


One of the beautiful things about distributing your activity via an iframe in an LMS is that it works well on mobile– even the process of copying and pasting my answers into the text box was relatively straightforward when testing this on my iPhone.


I hope this inspires you to try this out in your own courses, even if only on an unpublished demo page. If you need a Canvas space to experiment in, you can create a Free-for-Teacher account


If you have questions or get stuck at any of these steps, feel free to reach out in comments, or schedule a quick chat with me via my Calendly

Sunday, August 7, 2022

Enough About Me: Source Analysis Template Walkthrough

As promised when I introduced the Source Analysis Template, I have also created a walkthrough to using it. If these steps seem like a lot, don’t worry! This is a pretty granular breakdown, and some of these steps are repeats from the download process in the first post.

Setting Up

  1. Download the Twine desktop app from Twinery.org and the HTML file for the template. 
  2. Once you reach the Story Listing in Twine, click “Import from File” on the Side Menu. Click “Choose File,” then select the template file. 
  3. The template will appear as a story in the Story Listing view. 
  4. This is a good point to do the following two actions: 
    • Duplicate the file so that you have the template for safekeeping, and a work file for your new activity. That way, you can go back to the template if needed, or duplicate it for other uses in future.
    • Click the Settings (gear) icon next to the duplicate and select “Rename Story.” Give your activity a descriptive title, as this will appear in the activity once it is complete.
  5. Click on the template to open it.

Welcome

  1. Double click on the “Welcome” passage to open it. 
  2. Replace the all caps text in between the two sets of tildes, as well as the tildes themselves, with text relevant to your activity. (example: ~~ THIS ENTIRE THING ~~ would become Your Text)
Screenshot of demo view of Source Analysis Template info page. Title and Title of Text are rendered in blocky, all-caps formatting.
    Leaving the tildes will result in your text looking like "Title" and "Title of Text" in this 
    image in the finished product-- which, if you like it, great! If not, take out the tildes.
  1. You should also, of course, feel free to edit or omit other text that may not apply to your use of the activity-- for example, if you don't want your students to turn in the answers at all, or if you want them to complete the activity in one sitting, some of the instructions may not apply. 
  2. If you’d like to link to a copy of the source or excerpt, edit the link text given in the Welcome passage in the paragraph beginning “If you’d like, you can pull up a copy of…” Put the URL link itself in the first set of quotation marks, and the text you’d like to link (usually the title of the source) in place of ~~LINK TEXT WITH TITLE OF SOURCE~~. 
    • For example, this:
      <a href="https://avalon.law.yale.edu/ancient/hamframe.asp" target="_blank">Code of Hammurabi</a>
    • Becomes this:
      Code of Hammurabi
  3. This version of the story asks for the student’s name in the Welcome passage , so that their answers at the end will have a name associated with them. If you don’t need this feature, you can delete the question and the code for the input box ({text input: 'studentName'})
  4. Close the passage by clicking the x at the top right. You’re done with this one! 

Source

Okay, this is the fiddliest bit, but I promise it’s not so bad. There’s even a nice visual walkthrough to help you out. Ready?
  1. Replace “~~TITLE OF TEXT~~” with the title of your source or excerpt. 
  2. Replace “~~ADD YOUR TEXT HERE. PUT TEXT YOU'D LIKE TO LINK INSIDE ONE OF THE FOLLOWING:” with the full text of your source or excerpt. 
  3. Identify the words within the source that you would like to link to another passage. Copy ‘em.
  4. Go down to the link list. Replace “~~LINK TEXT 1~~” with the copied text. 
  5. Highlight the entire line. Cut. 
  6. Highlight the words you copied earlier in the passage. Paste. You’re done with the first one!
    • Here's what that process looks like. Every little yellow flash in this clip is a CTRL+C (Copy) or a CTRL+V (Paste). 

  1. Repeat this process with each selection of text you want to link. Delete any links you do not use.

Items

There’s lots of code-looking stuff here, but never fear! Each of these lines that begin with "{text input for:" simply creates an input box where students can write their answers, one input box per line. 
  1. Add any questions or comments you’d like to the Item 1 box corresponding with the text you linked to this passage. 

  2. If you’d like a text input option for students to respond to your questions:

    • Cut and paste the first line of code from the list beneath the relevant question.
    • Repeat for all questions in that Item. Delete any you do not use (or else you’ll have a list of extra input boxes in your passage).
    • Each input option can each only be used once in your story. So, if you used ‘inputA’ and ‘inputB’ in the Item 1 passage, you’ll need to remove these two from the next slide and use 'inputC,' 'inputD,' etcetera. 
  3. If you don't want a text input option, simply delete all text before {back link, label: 'Save and go back to excerpt'}.

Submission Instructions

Okay, home stretch! There’s so little you need to do here, it almost doesn’t seem fair. 
  1. Choose one or both sets of instructions for submitting answers. Delete any irrelevant instructions. 
    • If you did not use any text inputs in your activity, you can delete this passage entirely or replace everything before the {back link} with any concluding text you like. 
  2. Replace “~~YOUR PREFERRED SUBMISSION INFO~~” in the instructions you choose with the email, LMS assignment submission link, or other details needed for students to submit any work they’ve created. 
That’s it! You’ve got a Source Analysis Activity of your own. If you have questions or get stuck at any of these steps, feel free to reach out in comments, or schedule a quick chat with me via my Calendly

P.S: Now that you’ve made this lovely thing, how do you put it out into the world? We’ll talk more about that in the next post. 


Saturday, June 4, 2022

Plug and Play: Source Analysis Template

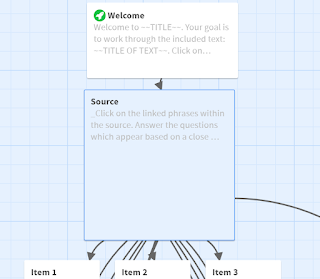
Editing View of Source Analysis Template in Twine

Ever since I created the Source Analysis I activity, I've been wondering if there was a way to reduce the friction of creating a close reading exercise like this even further than just providing an example. Twine is a fairly low investment technology to pick up, but to start from scratch can be intimidating, and there can be a high barrier to trying new things for teachers who simply don't have much time to argue with technology. 

To help with this goal, I've created a template for making a source analysis activity similar to Source Analysis I. I have tried to make it as self-explanatory as possible to use (at least, if you’ve read the previous posts and/or demoed the Source Analysis I Activity), so feel free to download it and jump right in yourself! However, if you’d like a more detailed walkthrough to using it, one is coming. 


This template is good for activities like: 

  • Close reading of a fiction or nonfiction text guided by questions
  • Encouraging annotation of specific passages
  • Creating notes about a source that will inform a paper or exam question

For the particularly imaginative, you could also use it for:

  • Having students read and dissect the key requirements of a paper or project prompt
  • Reflecting on the different formats of a text (what different things did students pick up reading the piece in its original format versus within Twine?)

To start working with the template:

  1. Download the Twine desktop app from Twinery.org and the HTML file for the template.
  2. Once you reach the Story Listing in Twine, click “Import from File” on the Side Menu. Click “Choose File,” then select the template file.
  3. The template will appear as a story in the Story Listing view.
  4. Optional: This is a good point to do the following two actions:
    • Click the gear icon and click “Duplicate Story.” This will make a copy of the file so that you have the template for safekeeping, and a work file for your new activity. That way, you can go back to the template if needed, or duplicate it for other uses in future.
    • Click the Settings (gear) icon next to the file you plan to work in and select “Rename Story.” Give your activity a descriptive title, as this will appear in the activity once it is complete.
  5. Click on your work file to open it.

In creating the template, I worked out a couple of irritations of the original:

  • If using a link to an external site, placing it into the template as provided will now automatically open it in a new tab, rather than either opening in the existing tab (thus navigating away from the activity) or requiring users to right click and select "Open in a new tab" manually (which is annoying to have to remember). This update is thanks to this question and answer in the Twinery forum!
  • The original activity required players to make a slightly unnecessary choice between whether they were going to write down their answers separately or in the input boxes. Although this was useful for the purposes of demonstrating two different approaches, it really wasn’t necessary for a template– if not using the input boxes, the creator can delete them, or the players can ignore them.

You may have noticed it’s been a while since my last post, and that’s primarily because every time I sit down to publish this template post, I come up with a new way to make the template or the instructions better which requires an additional hour of Googling, fiddling, and fighting with Blogger. I then created a bunch of content which felt like too much for one post; I like to keep these somewhat bite-sized. So, I’ve created a lot and split it into smaller, time-released bits, like those pain reliever capsules with the little spheres inside. (Is that what those do? Not sure, but they look fancy, so I’m going with it.)

Now, finally, I’m releasing the template out into the world, with the promise of additional supportive content to come, including a walkthrough (with a helpful video demo or two) and some upgrades to this template that you may like to experiment with. I’m also offering some small-group or one-on-one meetings for anyone who wants support or ideas for using this template; feel free to schedule an open time on my Calendly. And, if you decide to use it to create your own resource, I’d love to see the final product or hear about how you used it!

Monday, January 31, 2022

Take My Advice: Four Tech-Fueled Efficiency Tips I Wish I'd Known Four Years Earlier

Front cover for the video game Civilization V.
If you'd like a tech-fueled inefficiency tip, this image should serve. 

I have always been technologically curious, but as one grows and changes, perhaps it is inevitable that one realizes what they didn't previously know or appreciate; so too have I realized that there were lots of technological possibilities that I was slow to take up. There seems to be an undertone of skepticism among folks in academic humanities circles about using technology, systems, or techniques for efficiency and an even greater fear of admitting one has engaged in such behavior, and so I perhaps unnecessarily developed an aversion to using it to support my research; though I was keen on incorporating tech into teaching, my process of doing so was admittedly prone to making my preparations more time-intensive rather than less (implied, I think, by my observation in this 2018 reflection on preparing my Fiction and the Historical Imagination course). Part of this, I think, was a symptom of a peculiarly humanistic tendency (or so it seems to me) to feel that to save time is to be cheating in some way; that if our work is valuable it is valuable because we agonized over it at great length, and can be said to have depended upon no one but ourselves and our incredible intellects. Ultimately, however, both students and the work, not to mention my own well-being, have been better served by embracing ways to make life a little easier and a little more collaborative. As a result, in this post, I'm reflecting on four things I came to appreciate in the last two years or so that I really, really wish I'd been doing the whole dang time.

Use OCR

Optical Character Recognition (OCR) is much better than it used to be, and it doesn't have to be perfect to be helpful. I think I became hesitant to try again with OCR after an ill-fated attempt at digitizing a single issue of Cosmopolitan magazine so I could "perform Digital Humanities" on it as an undergraduate. However, toward the end of my dissertation writing process and into my current work I've seen how improved the technology is and how much I now take it for granted. If you have archival photos or scans, try using Adobe Acrobat or a free OCR tool to recognize the text. This will not only make it more accessible if you are distributing it to students, but also make it easier for you to search for terms within it (which would have come in very handy had I figured this out earlier in my dissertation research process, as I worked almost entirely from archive photos and scans while writing).

Use Excel

You know you can use Excel for whatever you want? You don't even have to be a card-carrying "quantitative researcher." Here's one thing I now use all the time and which would have worked well in conjunction with the idea of OCRing things: the UNIQUE function, which can take a list of items and strip out all the repeats, leaving only one iteration of each name, number, list item, etcetera. Imagine how much more easily I could have answered questions about how many disabled children were represented in an issue of a periodical if I'd known this.

Use the Internet

You don't have to do everything yourself. Some subjects have existing resources, whether entry-level memorization and practice activities on tools like Quizlet or Kahoot or mid- to higher-level activities created by other instructors and distributed on educational resource sites like MERLOT or the Zinn Education Project or through affinity groups like the Reacting Faculty Lounge or via personal blogs (hi!). Some activities pitched to high school learners can be employed usefully in a higher education setting with a few tweaks. Some materials can also be created by students as part of their learning process; instead of making a Quizlet for students to practice with, ask groups to create their own Quizlets of the top five or ten topics / terms / concepts and compare their results. 

In short, I wish that I had appreciated earlier how many other things existed that I could use rather than reinventing the wheel every time. Sometimes it seemed like it would have been harder to find and enact an idea elsewhere than creating it myself, but looking a little harder could have paid off-- not only would this have saved me time, but it would have been useful to me to see how other people were approaching teaching various topics to inspire the activities and assessments that I created.

Use a Repetition-Mitigator

Relatedly: If you do have to do something yourself (making an activity, grading), you don't have to create everything from scratch every time. It's great to make something new! As I've mentioned in a previous post on career preparation, if you are an early career teacher, it's in fact essential to make some new things if you'd like to be able to fruitfully reflect on those experiences in later job interviews or teaching statements. However, if you save time on some of the more rote requirements and/or incorporate already existing resources, you'll have more time for creating novel activities and giving meaningful feedback. 

Efficiency in grading is one example of this. Rubrics and comment libraries (either technological ones, like within LMS systems, or low-tech numbered lists you can show to students in conjuction with papers marked with corresponding numbers) can allow you to skip writing "Needs to use at least three sources" in paper comments seventeen times, leaving additional time to write more specific and useful comments like "Your paper's argument might benefit from a closer read of Source A" or "If your goals are X, you should focus on Y aspect of the homework for next week." I only started appreciating what a time-saver this could be late in the game, and I wish I'd used it more thoughtfully and more often.

What tips, strategies, or tools do you wish you'd appreciated and used earlier? Feel free to let me know in the comments-- I just may have to start adopting them myself.

Related Links: 

One of my favorite activities supported by an existing resource: after being asked to deliver a short lesson to a group of epidemiology students on the fly during my time at the Johns Hopkins Center for Talented Youth, I followed a brief lecture on the history of polio with asking students to play the Smithsonian National Museum of American History's Got Ramps? Architectural Barriers Game and compare notes on which endings they achieved. 

If you're interested in the NMAH's work on polio, or thoughts on incorporating museum resources and exhibits into teaching, you may be interested in revisiting this 2017 post on the curator's interview with David Serlin.

Monday, September 28, 2020

Enough About Me: Using Interactive Fiction Tools for Source Analysis, Part II


The time has come: It's part II. In my last post, I introduced an activity made in Twine which can be adapted for various sources, allowing students to undertake a source analysis. In this post, I'll show how how it came together. 

How Did You Make This?

Good question! I'll break it down. 

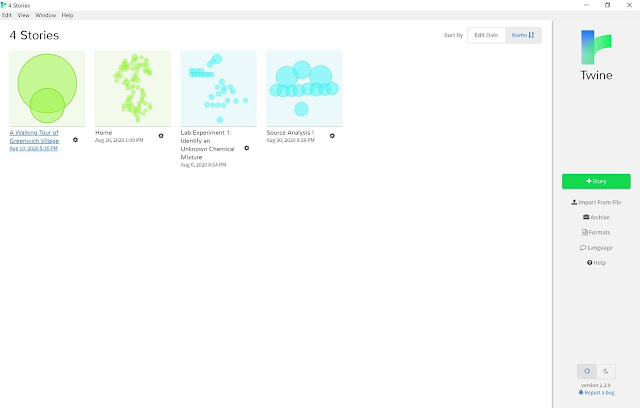
First, I popped open my Twine application, which looks like this: 

Screenshot of my Twine archive. 

To start a new story, I clicked the green button on the right. Then, a blank canvas awaited! I added the first passage. 

The first passage of Source Analysis I, in Twine. 
(Note: the story format I used for this project is called Chapbook.
More on this, and why it's important, below.) 

Each passage represents a different page of text. As you may have noticed, there are a few parts to this passage. The title at the top, which is not seen by the player. The tag section, which I'll ignore for now because I rarely use it. And the text section, which is where you put the words you want students/players to see. 

You may have also noticed a couple of codey-looking things here in the text section. First, the double asterisks (**) surrounding some phrases, which makes them bold. Secondly, the double brackets; these are the most important things you need to make a Twine. Every double bracket makes a link somewhere else, usually to another passage. If you put a double bracket around some text, it creates a link to another passage and titles it with that text. Twine then puts an arrow connecting the first passage to the new passage. (You may also notice the external link above-- more on that later.) After completing Source Analysis I, I had a structure that looked like this: 

The entire structure of Source Analysis I, in Twine. 

You also may have noticed that the two different paths available in Source Analysis I have the same questions, but one allows text inputs and one doesn't. Here's the passage for the first set of questions without text input: 

"there were many that corrupted the service of the Lord" passage, in Twine.

The only code here is {back link}, which provides a link back to the previous passage labelled "Back."

For comparison, here is the corresponding passage from the other track of the activity with the text inputs: 

"service2" passage with text input code, in Twine. 

All that was needed for me to put in the text input boxes was to pop in a bracket ([), tell Twine I wanted a text box (text input for:), specify a variable ('serviceA'), and close with a bracket. I also opted to make them optional (required: false), so that students could move back and forth between pages as much as they wanted. Each of the text input boxes throughout the activity has a different variable attached to the information that the student puts in that box.

I also chose to relabel the "Back" links on these pages, to reassure players that this responses would be saved if they went back (label: 'Save and go back to excerpt').

The last critical piece of this activity is the final page, which returns all of the variables I set on the other pages and lets students know how to turn in their answers:

"Submission Instructions" passage with variables, in Twine. 

When I completed this activity (putting in some truly solid answers if I do say so myself), skipping some questions and answering others, this was what my final page looked like, with the answers I gave replacing the variables on the page above and the unanswered questions simply printing the name of that variable. 

Screenshot of final passage with example answers, in itch.io.

Finally, I published the game to an HTML file by going to the name of the game at the bottom left, clicking on it to bring up a menu, then clicking the last option:

Source Analysis I structure with menu open, in Twine. 

Limitations...

In the last post, I focused on goals and benefits of using this activity or something like it. Now I want to highlight a few limitations and things to consider if you want to use something like this for yourself. 

...of this activity

  • You may notice that if you choose Passage I, the option in which you type nothing, or if you don't put text in a box, the final page shows the variable for the empty boxes instead of just being blank. There are ways in which to make this display differently, but I wanted to keep this example relatively simple. If you're curious, feel free to reach out. 
  • I noticed that Print To PDF for the end page did not work well on itch.io, but it did all right when I tried a version of the game posted within an LMS. So, your mileage may vary on being able to capture the last page in a PDF versus other methods like screenshots or copying and pasting the text. 

...of Twine

  • Twine remembers things in the browser. As the beginning screen of this activity notes, that means that someone who wants to do this activity needs to use the same browser all the time. They should not use incognito mode if they want to save their progress (and depending on the game, it may not work in incognito at all). This also means that anyone opening the same browser on that computer will open the activity to the same point and with the same information still saved in the input boxes, so remember this if you have anyone sharing devices. 
  • Depending on how you host your Twine, it may not show up on mobile, or display awkwardly. (You used to be able to use philome.la and it was so easy--- but alas, it is no more. Here's hoping someone picks up this torch). To ameliorate this issue, there are a couple of things you can do; I'll offer what I think are the two easiest.
    • You can upload Twine files to an LMS and play right within the LMS page-- different systems all handle this slightly differently. I tried with this game on an old Compass page and it seemed to work well in both the Blackboard Instructor app and in a mobile browser. 
    • You can also upload your game/activity/interactive whatnot to itch.io. After you create an account, you can upload games and activities' HTML files (which is what Twine gives you when you publish your activity). This is where, as you may have noticed, this activity is hosted. Itch.io offers a lot of options-- you can fiddle with the size of the display (Source Analysis I is 650x900), check a box to enable mobile-friendliness, etc. Lots of Twine games are hosted there.
  • Lastly, Twine can incorporate photos and audio, but the image and audio files themselves can't live within the game file, which can get a bit tricky. I would rate incorporating those things as a bit more advanced than you may want to experiment with on your first go-round, but it is doable. 

I want to experiment with Twine! 

Hooray! Just visit https://twinery.org/ to get started. You can use the tool in your browser, which will save your work to the browser, or you can use the downloaded version (I prefer this). 

Please note: Like player progress, Twine also saves your projects in progress themselves in your browser (whether you use the desktop version or not), meaning that deleting your history, cookies, etc can wipe away your games too. To avoid disaster, archive often: From the story list, click the "Archive" button on the right, then save the resulting file to a location you can find later. This will bring your entire library back if you lose it!

I want to make something like this or edit this to make my own thing!

Hooray! Feel free to use this framework in your classes,  and change it however works for you. (If you publicly post any versions, a linkback here would be nice, and I'd love to hear about your project!) All the text in the project can be found here (so if the screenshots above are difficult to read, you can find all the text they display here as well).

Please note: There are multiple story formats (that is, highly specific programming languages) for Twine, meaning that depending on which one your Twine is set to,  some commands or features are done differently. This activity uses the Chapbook story format, which is relatively new and easier to learn than older formats. If you'd like to use Chapbook, set that as your format by clicking the title of your game while you're editing it, then clicking "Change Story Format" and selecting Chapbook. If you want to learn more about what you can do in Chapbook, see the Chapbook Story Format Guide.

However, all story formats will let you use double brackets to let you link between passages; for example, [[Passage I]]. If that's all you want to do, you don't need to worry about story formats.

Questions? Ideas for using Twine in other ways? Let me know! 

Monday, August 31, 2020

Enough About Me: Using Interactive Fiction Tools for Source Analysis, Part I


A scrolling text gif: Home. There is a blog post open on the screen. Input: Read blog post
Scrolling text gif courtesy of Screedbot.

I've recently been rediscovering my love of interactive fiction, a formative medium for me when I was growing up. 

A Brief Intro to Interactive Fiction

Interactive fiction (IF) includes several different classifications of thing, but usually the term refers to text-based (though not necessarily exclusively text) software games or stories which allow players to have some amount of control over how and/or when the story unfolds. There are two main styles of IF: choose your own adventure (CYOA) style, which offers a limited number of options that you can click on (similar to the old Choose Your Own Adventure books, which had you make decisions by flipping to a particular page), and parser IF, which allows you to type in the actions you want to take within the narrative. Some interactive fictions are more focused on telling a story,  while others are more focused on creating a game experience (solving puzzles, winning). 

Screenshot from CYOA style game Birdland, by Brendan Patrick Hennessy. Surprisingly, unrelated to my Fiction and the Historical Imagination course. 


Screenshot from parser IF game Counterfeit Monkey, by Emily Short.
Image: Media Archaeology Lab. 

Before recently, I had never really tried to make my own games, content to play others (almost entirely parser IF); however, more recently I've been working on a few personal projects in the CYOA style. In this post, I want to talk about a couple of ways to use a tool often used for creating CYOA-style interactive fiction in the classroom: Twine.  

Make Your Own Adventure

When I sat down to write this post, I thought that I'd talked before here about using Twine for history courses, but it turns out that I've only briefly mentioned the beginning of the Western unit. So, I'll preface this by saying that I've used Twine before in the classroom, assigning students to make their own takes on the Western genre which incorporated gamified or choice elements. Twine is a great tool for this sort of thing because it is very easy to learn enough to get started making a narrative. My Fiction and the Historical Imagination students used Twine for a "hackathon," spending the whole of a 50-minute class period putting together their games in small groups, and did a fantastic job embracing, challenging, and pushing the limits of the Western genre. 

So, Twine can pretty easily be used as a student assignment tool. However, there are also ways in which instructors can make something in Twine to assign to students. Here's one example that works well for history: source analysis, especially close readings of shorter texts. So, being curious about how this might look, I knocked out a potential example, which you can experiment with either in the embedded version below or directly on itch.io.


"Source Analysis I" (a creative title right up there with my childhood stuffed animals "Lamby" and "Mr. Bear") took me about an hour and a half, not counting all of the other distractions I got up to along the way like changing the wording around, taking screenshots for this post, and testing it on a variety of devices and browsers. The goal is for students to click on the parts of the text that are linked to questions related to that phrase or idea, and answer the corresponding questions. As you may notice, this version of the activity offers students the option to collect their answers in their own document and turn that in, or type their answers directly into text boxes under each question; the answers are then returned to them all together at the end in a single page that can be emailed, printed, or submitted to an LMS. One could also assign only one or the other format; I wanted to include both in this activity to illustrate that there are multiple options for doing this sort of activity (and you can offer all, some, or only one to your students directly), and that one takes almost no "coding" and the other only minimal coding.

How much coding, you ask? In part II, I'll walk through the process of creating the activity, and talk more about the limitations of this particular version and of Twine overall. For now, though, I'll leave you with some of the...

Benefits of this activity

One of the things that can often be difficult about reading for college courses is figuring out how, exactly, you are supposed to read something. In history courses, we often want students to skim the textbook and pay close attention to the details of a primary source, but it can be difficult to explain and emphasize this distinction in a way that feels natural.  I like that rendering a passage in Twine this way, with particular segments linked to related questions, makes the act of close reading feel more intentional, and the source as a whole a bit less daunting. Selecting a particular phrase and digging deeply into it becomes a more finite undertaking; it is no longer a long sheet of questions but rather a series of small tasks directly embedded into the text itself. 

This version is a bit handholdy, suitable for an introduction to this sort of close reading. One could climb a bit higher on Bloom's Taxonomy by asking one or more follow-up questions; I like the idea of asking a student what segment of the text they would highlight and questions they would add if they were going to edit the game themselves. 

I'll be back with part II soon, with a detailed walkthrough of how to make a similar activity. If there are any particular questions or features you'd like me to address, feel free to drop them in comments! 

Related links:


If you want to try playing interactive fiction yourself, the Interactive Fiction Database (IFDB) is a great place to start. (You might find this friendly beginner list or this other friendly beginner list useful.


The Interactive Fiction Archive might be of interest to digital humanists/technology historians.

Tuesday, March 31, 2020

Plug and Play: The Handy (Digital) Dandy (Research) Notebook

It's been a challenging month (years from now, I'm sure future historians will marvel at how just about every piece of conversational writing begins with a similar observation; many people on the internet have made similar observations). I've been trying to figure out what I could post here that would be most useful-- more links to more online resources offering more ways to transition classes online? Reflections about historical epidemics and the history of medicine? Cute dog pictures to ease the stress? 

With perhaps the exception of the last, it seems like there are already enough of these to go around, written with more expertise than I have in distance learning, and epidemiology, and dog ownership, respectively. Instead, I wanted to offer up an activity idea I had recently, useful for both in-person and online classes, designed to aid writers of all levels in their research process: The Handy Dandy Notebook.

Okay, maybe one dog picture.
Winking black and brown puppy photo by Dominika Roseclay from Pexels. 

A few caveats: This is not only a fairly straightforward activity to assign to a class; it's also a pretty good reflection of my own research process on projects big and small, which means it's idiosyncratic; it may not be useful for the naturally organized, the meticulous outliner, or the linear thinker. However, it has been a lifesaver for me, and I often wish that someone had suggested this process to me as an undergraduate. Moreover, although I am envisioning it as it would be used in a history course, it could easily function for a lot of disciplines which emphasize finding, analyzing, and evaluating information from a variety of sources.

First, you'll need a shared online (semi-)collaborative space to work in. I like and recommend OneNote for this because it allows you to just absolutely dump things in indiscriminately-- you can type anywhere you like in the work area, handwrite with a tablet and stylus, drop in PDFs either as shortcuts to a download or embedded directly into the page, and highlight, underline, or scribble on any or all of those things with various pens. Those functionalities are fun and helpful; however, you can easily accomplish something similar with a Google Doc or set of Google Docs, a Word document uploaded to a course platform or Box folder, or a variety of other software options. 

Next, each student needs a topic. This could be put to great use as a research paper starter, particularly in the phase in which students have chosen topics but have not yet figured out which sources they will use. It could also work well as a way to give students a taste of a topic that you are about to begin discussing, revealing what mass culture has to offer on the subject before jumping into its academic treatment. For example, before students in my Fiction and the Historical Imagination course began our section on Westerns, I asked them to look online for any source that sparked their interest which purported to define or explain the Western and post it to a Compass discussion board. 

Third, each student needs a space in which to work (their "notebook"), and time in which to do it. If using a collaborative option, give each student a page or section of the shared space. You can outfit this however you like; you may wish to just indicate the name of the student, or you may wish to provide brief reminders, instructions, or suggestions based on their proposed topics. I would offer the following instructions at minimum: 

  1. Copy and paste every link you look at into your space, and remind yourself a). what was in it and b). what you thought about it. 
  2. This is not formal-- worry about "future you" looking at it, not "present me." That is-- these are designed to be resources for your project; it's not designed for me to evaluate how "well" your initial research is going. 
As far as time goes, I'd suggest giving students a rough, relatively brief amount of time that you'd like them to spend researching to limit stress and maximize the benefits of unstructured research time. 

Next, stand back and wait! Let students chase down their topics. 

Next up is classwide comparisons. When it comes time to discuss (in person, synchronously over Zoom or in a class chat, or asynchronously in a discussion board), they should examine others' notetaking styles and see what stands out to them-- do you see any techniques you'd take for yourself? What did others think was important, and how does that compare to what you noted about your sources? 

In my own work, it's about 50/50 that I return to my notes weeks or months later and think "Oh, right!" versus "Huh?" Optional but useful, depending on your goals: Have students return to these notes two or more weeks later in the semester. Do they still remember these sources? Do their notes make sense to them, or would they need to reread the sources if they wanted to write about them? This could be examined in an individual reflection, a class or small group discussion, or in the context of actually using the notes to craft a paragraph or other short assignment.

What does this activity, as a whole, do for students? At the most basic level, it encourages the beginning of reflection on a writing topic, offering permission for students to get started early. Perhaps more significantly, it offers students the chance to practice and get feedback on something that can be quite mysterious: the research process itself. Frequently when others have tried to introduce notetaking approaches to me, it has failed miserably because my writing (and, really, everything) style is chaotic; I need novelty and mess at the beginning before I can transition anything into order and linearity. This activity offers beginning writers both (to mangle a cliche) roots and wings: enough boundaries to feel secure enough to try; enough freedom to take a chance. Finally, and maybe most practically, by getting into a habit of noting literally every site and piece of information they look at online, a writer is less likely to struggle with both plagiarism and the frustration of tracking things down later that they didn't realize they'd want to use. It's only through trial and error that I've realized that it can be good to elaborate on where I found a document I'm making notes on as well as just the title and the author (was it Google books? An interlibrary loan? An archival document?), because it's never as easy to remember this a year on as I thought it would be at the time. It's also a very helpful tool for writing these blog posts-- where else would I get all the links I end up putting in? 

How do you help students practice good research habits in your discipline? Are you finding it more difficult to do so in the wake of moving instruction online? Let me know! 

NB: I hope you are all doing well in this stressful time. If any of you self-quarantining find yourself with more time at home than usual on your hands, want to share any of your struggles and triumphs of pivoting to remote education, or have questions or topics you'd like me to address, I'd love to feature your guest posts and/or answer your questions. 

Related links: 

Title talk: I'm very skeptical about this, but apparently if you want your own handy dandy notebook, you can buy one at this self-titled online store?

Authors that have talked about the type of writing that involves "making a mess and then cleaning it up," like Anne Lamott and Joan Bolker have helped me (and inspired this activity) immensely.

If you are looking out for resources for online teaching, I suggest UIUC's Center for Innovation in Teaching & Learning list of resources for the COVID-19 transition to online instructional delivery. 

If you're lacking in a little light reading material, might I suggest this digital archive of 6000 children's books?